Today’s goals:
- Begin learning how to create a page layout with CSS
- Create div areas in CSS and apply them in HTML
- Experiment with absolute, relative, static, and fixed positioning
First, seat change for new quarter!
Today’s featured website:
- http://www.csszengarden.com/
- Please open this in Firefox. We’re going to look at the code (both HTML and CSS) and will use the web developer plug-in to disable the CSS.
Let’s talk about page layout
- What do we mean when we talk about page layout? What do you think it means?
- In pairs, choose a website to look at. How many sections can you identify? What is the page layout?
- Let’s use this cool tool to check out the CSS of any site you want!
- Review- classes, IDs, and elements- what are they and how are they all identified on a style sheet?
- Let’s draw some pages. Don’t forget to start with the box model!
Using CSS to create a layout for your webpage- need to know:
- ID (uniquely applied, usually used just once on a page)- preceded by # on style sheet. Used to identify one element and generally used to identify specific sections of a webpage (ex. menu, header, sidebar)
- Class (defines several things at once, such as text that’s bold, 16 point, and red, or a paragraph that has a background color of green)- preceded by . on style sheet. Can be used with elements.
- Elements (the various HTML elements, such as paragraphs, links, etc., that are defined by the style sheet)- not preceded by anything on a style sheet.
- While HTML has tags, CSS has selectors, which are the names given to the styles in your style sheet. For each selector, there are properties with values, like a headline that is bold, Arial, and 20 point font, for example.
- In the body section of your webpage, you use div tags that correspond to the selectors in your style sheet. For example, div id=”menu” or div class=”paragraph2″
- Helpful to look at again- CSS vocabulary
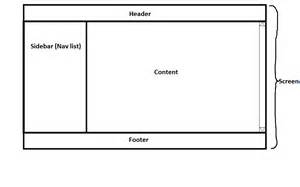
- Divs and containers: Containers are specific areas of a webpage that can contain text, images, etc. They are referred to as divs on your style sheet. They can be positioned with specific properties and can overlap.
- Class vs id: Generally an id refers to one element while a class can be used to refer to more than one element. For example, an id can refer to a specific section of your webpage for layout purposes (example: div id=”leftmenu”) while a class can be used to define a set of style properties to modify an element. Id’s are used to refer to specific containers (divs) you’ve created.
- Positioning divs on a webpage: Divs can overlap and are positioned either from the top left corner of the webpage (absolute) or in relation to their usual positions on the page (relative). Divs can also have a fixed position, which means they don’t move as you scroll along the page and stay in the same place. It is possible to put one div inside another and position them differently. Top, right, left, and bottom values are used to tell the browser where the div should be positioned on the page. The values can either be in pixels or as a percentage, which are relative to the parent element’s dimensions (example, a webpage that’s 900 pixels wide or a table that’s 500 pixels wide).
Let’s practice!
- Open Notepad ++ and start a new webpage. Put in the basic HTML tags such as html, head, title, and body. Make sure you close all of your tags!
- Put in a style sheet. Add the beginning and closing tags of an internal style sheet in your head section. We will add stuff to it soon. Look at one of your recent webpages to review what those tags are.
- Now we’ll practice setting up div areas together.