Today’s goals:
- How to add and adjust a page background image
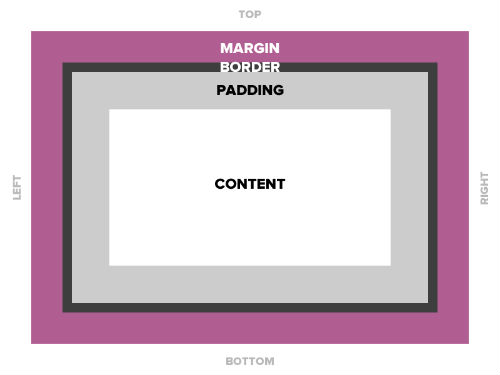
- Learn about a page wrapper/container and the CSS box model
- Learn about divs and IDs
0. Today’s featured website:
- http://willthefuturebeaweso.me/– no boring font here!
1. Adding a page wrapper/container
- Get rid of current background image- Comment out your background image by adding /* before the word background on line 22 and */ after the semi-colon on line 22.
- Add new background image- Copy and paste the background-image line from here onto line 23 (hit enter to give yourself a new line).
- What happened?
- Let’s fix the cutting off of the new background image by putting everything into a page wrapper/container.
- First, copy and paste the #wrapper code from here right below your body { } section in your style sheet.
- What happened?
- Now, move the three lines with style details about the background image in the body { } section by cutting and pasting them into the #wrapper section below the border-width: 5px; line.
- What just happened?
- Let’s talk about the wrapper/container and the CSS box model– get your drawing & let’s add some more stuff.
- About that div id below your body tag– what is it?
- Div ids are preceded by # on a style sheet. They are used to identify specific sections of a webpage (ex. wrapper, menu, header, sidebar).
- Divs are applied in the HTML to refer to specific sections of a page, for example, div id=”wrapper”. Everything in that div will have the properties defined for it in the style sheet, such as a certain background color, background image, font, border, etc.
- Elements are the various HTML elements, such as paragraphs, headlines, links, etc., that are defined by the style sheet and they are not preceded by anything on a style sheet.
- Time to get styling!
- First, find a new, large image to use as your background image. Pexels.com is a great place to look because the images are large (you want an image at least 1200 pixels wide; if you use one larger or smaller, either re-size it in pixlr.com or adjust your wrapper’s width in your style sheet). Also try Unsplash.com.
- Second, change the background color of both your body { } and #wrapper { } sections. You will want to choose colors that blend well with your background image. Good color list here.
- Third, try some other border-styles: solid, dashed, double, groove, ridge, inset and outset.
- Fourth, change the border color and width.
- Fifth, change your font colors so your font is more readable over your background image. Remember, you an add text-shadows (copy and paste that code from your h1 to other elements) and you can change the color of the shadow to anything you want.