1. What if you want to do this at home?
Here are some resources if you want to continue learning:
– Download Notepad++ to use as an HTML editor- http://notepad-plus-plus.org/
– Get other free programs for your computer- http://ninite.com/
– Free photo editor (advanced is similar to Photoshop)- http://pixlr.com/
– Create apps for free for Android devices (you will need a Gmail account)- http://appinventor.mit.edu/
– Links to even more cool things- https://www.mhswebdesign.com/cool-stuff/
Questions? Feel free to email me at agoldsberry@gmail.com.
2. Creating apps for Android with MIT’s AppInventor
Today we will use MIT App Inventor to create mobile apps.
Previously, you created mobile apps using a template in Dreamweaver CS6 and you focused on altering the CSS and HTML. With App Inventor, you will use a visual programming editor and will create apps that are a bit more complex than the simple mobile site we made with Dreamweaver. Also, unlike Dreamweaver, App Inventor can only be used to develop apps for Android devices, not for Apple.
We will test the apps you create on the test Droid phone I have and we will also use something new today- the Android emulator. The emulator is a “fake phone” on your computer that you can use to see how your app would look on a phone.
Everyone has App Inventor installed on their computer. To begin, go here:
Then click Invent
At this point you will need to log in using your Gmail information (username and password). If you don’t have a Gmail account you can use my school account.
We are going to do a tutorial together as a class.
Here is the tutorial we will follow:
http://appinventor.mit.edu/explore/content/hellopurr.html
Done?
Check out some more fun AppInventor tutorials you can follow to create another app.
What else to do?
Here is a big list of some helpful app tutorials. If you are interested in learning more about app development for Apple and/or Android, this list is a good place to start.
3. Infographics
We are going to use an online tool to create an infographic on a topic of your choice.
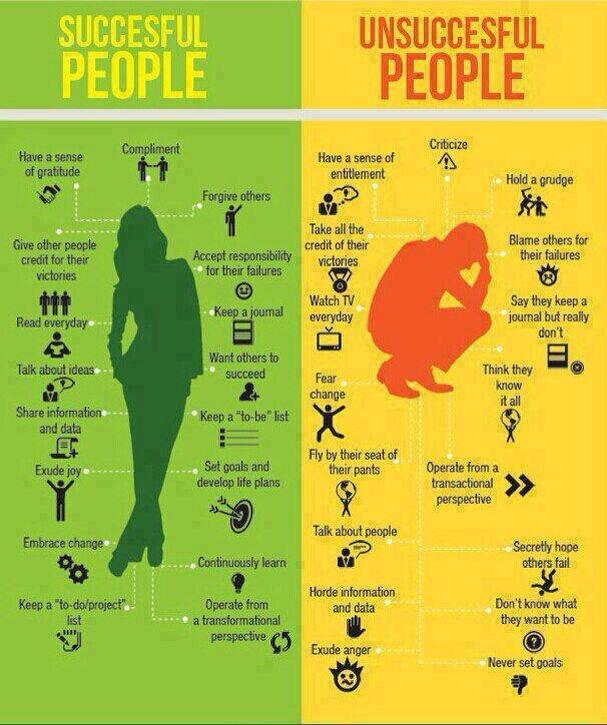
An infographic is a visual way to display data or to tell a story. It includes text, pictures, graphs, and sometimes videos.
Here is an example I like that I happened to find on a friend’s Facebook page recently. Click on the infographic to see a larger image.
Find inspiration for your topic on this website. Also try here. Or here.
We are going to use a cool new site, http://www.easel.ly/, to create infographics today. You will need to sign up for an account with an email address if you want to save your infographic and post it on your class page. To register for an account you will have to create a username and password.